
I ordered some transglutaminase (aka Meat Glue) a few weeks back, and started to play with it recently. My first experiment with meat glue was the most boring thing you can imagine: gluing two pieces of meat together to make one (bigger) piece of meat. Nonetheless, it was kind of awesome, and prompted me to make my first ever batch of home-cured bacon.
 The recipe, of course, came from Michael Ruhlman's Charcuterie, a book that has yet to lead me astray...
 So, I'd never really thought about making my own bacon, since Blood Farm sells absurdly good bacon and there are so many other fun things to do with pork belly... The bacon-making, in this case, was prompted by the meat glue acquisition. You see, when I blindly bought paper-wrapped frozen pork belly at Blood Farm a while back, I made the soul-crushing discovery that most of this belly was too thin to use for any cool applications. I portioned it out and vacuum-sealed it to sit in my chest freezer until a use came to mind... and the day my meat glue arrived I had a revelation: I could turn too-thin pork belly into appropriately-thick pork belly! Thus, this became my first experiment. I glued together two sets of two pieces, and turned one into bacon. Look at this useless piece of meat:
 I glued it to this slightly-less-useless-but-still-largely-useless piece of meat:
 There's nothing to using meat glue. I have the GS, which allows you to make a slurry that is active for up to 24 hours. I brushed this slurry onto the pork pieces, shoved one on top of the other...

 ... then vacuum-sealed my new, bigger, piece of pork belly to set overnight (with pressure applied, as well). Things were going so well the next day (The meat! It was glued together! Amazing!) that I forgot to take any pictures until I started curing. I used the "more savory" option on Ruhlman's basic cure, which incorporates bay leaves, black peppercorns, and garlic with the standard salt, sugar, and curing salt.
 This was vacuum-sealed (again) and tossed in the fridge for 7-9 days, turning every other day for even distribution of the cure.
 Things were much more liquid-y when it came out:
 Everything is rinsed off, and it's time to cook. The bacon-to-be goes into a 200°F oven until an internal temperature of 150°F is reached (about 90 minutes).

 The bacon is cooled to room temperature, then chilled in the fridge until slicing time. I made the first slice with a knife. Look how pretty:
 I sliced several more slices using my meat slicer, going for relatively thin pieces that I will then glue to other meats...
 It's fairly lean bacon relative to what you see in stores, and it tastes fan-freaking-tastic. It's definitely the most flavorful bacon I've ever had, with the garlic, bay, and pepper combining beautifully with sugar and salt. I'm in love. Suddenly, instead of seeing no reason to home-cure bacon, I can't wait to make my next batch...
 The recipe, of course, came from Michael Ruhlman's Charcuterie, a book that has yet to lead me astray...
 So, I'd never really thought about making my own bacon, since Blood Farm sells absurdly good bacon and there are so many other fun things to do with pork belly... The bacon-making, in this case, was prompted by the meat glue acquisition. You see, when I blindly bought paper-wrapped frozen pork belly at Blood Farm a while back, I made the soul-crushing discovery that most of this belly was too thin to use for any cool applications. I portioned it out and vacuum-sealed it to sit in my chest freezer until a use came to mind... and the day my meat glue arrived I had a revelation: I could turn too-thin pork belly into appropriately-thick pork belly! Thus, this became my first experiment. I glued together two sets of two pieces, and turned one into bacon. Look at this useless piece of meat:
 I glued it to this slightly-less-useless-but-still-largely-useless piece of meat:
 There's nothing to using meat glue. I have the GS, which allows you to make a slurry that is active for up to 24 hours. I brushed this slurry onto the pork pieces, shoved one on top of the other...
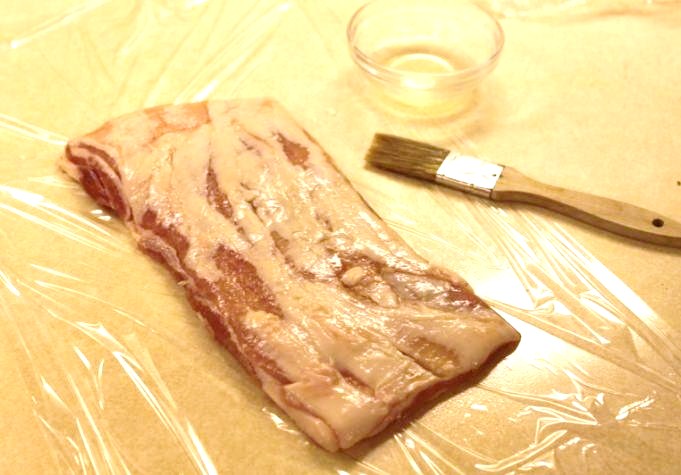
 ... then vacuum-sealed my new, bigger, piece of pork belly to set overnight (with pressure applied, as well). Things were going so well the next day (The meat! It was glued together! Amazing!) that I forgot to take any pictures until I started curing. I used the "more savory" option on Ruhlman's basic cure, which incorporates bay leaves, black peppercorns, and garlic with the standard salt, sugar, and curing salt.
 This was vacuum-sealed (again) and tossed in the fridge for 7-9 days, turning every other day for even distribution of the cure.
 Things were much more liquid-y when it came out:
 Everything is rinsed off, and it's time to cook. The bacon-to-be goes into a 200°F oven until an internal temperature of 150°F is reached (about 90 minutes).
 The bacon is cooled to room temperature, then chilled in the fridge until slicing time. I made the first slice with a knife. Look how pretty:
 I sliced several more slices using my meat slicer, going for relatively thin pieces that I will then glue to other meats...
 It's fairly lean bacon relative to what you see in stores, and it tastes fan-freaking-tastic. It's definitely the most flavorful bacon I've ever had, with the garlic, bay, and pepper combining beautifully with sugar and salt. I'm in love. Suddenly, instead of seeing no reason to home-cure bacon, I can't wait to make my next batch...
No comments:
Post a Comment